Launch Android App with Local Nodes
This guide explains how to run the full Interstellar stack locally using Docker or Podman. You will be able to launch the Substrate node, Integritee TEE worker, and IPFS service, then interact with the system using the Interstellar Android demo app.
This setup enables full offline testing without relying on a hosted VPS.
This compatibility note applies to the backend stack, tested on Ubuntu 24.04 LTS (x86_64) using Docker (docker-compose) or Podman (with manually installed podman-compose*).
The stack is expected to work on other recent Linux distributions, but this has not been officially verified.
Known issue: May fail on Apple Silicon (M1/M2/M3/M4) - due to current SIMD usage and QEMU/Rosetta limitations - crash on M1/M2 (not tested on M3/M4)
The frontend (e.g., Android emulator or physical device) can run on any OS supported by Android Studio (expect some emulator limitations on Apple Silicon)
*Compose tools are required to manage service startup dependencies (e.g., health checks).
1. Prerequisites
| Requirement | Install Guide |
|---|---|
| Docker | Install Docker |
| Docker Compose | Install docker-compose |
curl, wget, jq | Installed via apt/brew or default in most environments |
| Android Studio | Install Android Studio |
ADB (adb reverse) | Comes with Android Studio |
You may also use Podman as an alternative to Docker.
2. Launch the Interstellar Stack Install
The BTC worker connects to a Bitcoin Testnet RPC endpoint using a hosted provider.
For simplicity, we provide curators with a ready-to-use .env file.
Place the file in the same directory as docker-compose.yml.
⚠️ Ask us directly for an updated .env file.
# Step 1: Create a working directory for the current milestones[x]
mkdir interstellar_m[x]_demo && cd interstellar_m[x]_demo
# Step 2: Download the stack config with the specific curl link of the current milestones [x]
curl -L -o docker-compose.yml https://raw.githubusercontent.com/Interstellar-Network/containers/refs/tags/testnet-m[x]/docker-compose.yml
curl -L -o docker-ipfs-init.sh https://raw.githubusercontent.com/Interstellar-Network/containers/refs/tags/testnet-m[x]/docker-ipfs-init.sh
chmod +x docker-ipfs-init.sh
# Step 3: Place the .env file we send in this directory
specific for current Milestone delivery - previous .env should not be reused
# Step 4: Start Docker (if needed)
sudo service docker start  # (for most Linux distros)

# Step 5: Launch the stack
sudo docker compose down --timeout 1 && sudo docker compose up --force-recreate
⏳ Waiting for Master Circuit Generation
Once the node and service are running, the system will automatically trigger the generation of master circuits from the hardware description files.
These circuits are compiled using the Verilog logic generated from the original master circuits specifications, processed through the logic synthesis pipeline. This step may take several minutes depending on the environment.
During this time, monitor the logs and wait for the following sequence of messages:
[ocw-circuits] callback_new_skcd_signed sent number : <number> 1-Success  - 0-Fail
[ocw-circuits] callback_new_display_circuits_package_signed: (<CID_1>, <message_digits_number>), (<CID_2>, <pinpad_digits_number>) for <account_id>
Shortly before these messages, you will also see large blob uploads to IPFS such as:
Requested started id=<...> method=POST uri=http://ipfs:5001/api/v0/add
These blobs correspond to the master visual circuits (SKCD display circuits), which are the result of the hardware synthesis pipeline. Their appearance in the logs is a strong indicator that the build process has completed.
ℹ️ You can identify this moment easily by spotting two large IPFS file hashes being logged together — one for the secure keypad circuit and one for the display message circuit i.e one time code These hashes will later be used for visual challenge rendering and validation.
Detailed example from integritee_node-1
Requested started id=1059 method=POST uri=http://ipfs:5001/api/v0/add
[fetch_from_remote_grpc_web] content_type: application/json
[ocw-circuits] callback_new_skcd_signed sent number : 1
[ocw-circuits] callback_new_display_circuits_package_signed: ("QmUx8mMo8GgGdUhcgFQVg2sexkVfyq1sViruZiBadUfs4d",2),("QmcwXyZNmLXnjeoA25YSzj41G1sr6ZsHgZZBQVWvcfe1qn",10) for d43593c715fdd31c61141abd04a99fd6822c8558854ccde39a5684e7a56da27d (5GrwvaEF...)
[ocw-circuits] Hello from pallet-ocw-circuits.
🛌 Idle (0 peers), best: #6 (...), finalized #3 (...), ⬇ 0 ⬆ 0
You can also verify the runtime is ready using Polkadot.js
While waiting for the stack to fully initialize, you can explore the architecture and rationale behind
the VCA System Layer. This layer is responsible for producing the VCA Token,
the core cryptographic artifact used by the Trusted Action Validation Protocol (TAVP).
The token is generated through a hardware-secure pipeline starting from VHDL logic descriptions, synthesized into
Verilog and compiled using theYosis and abc logic synthesis toolchain. The resulting master circuits define both the secure display and interaction logic — including the Secure Circuit Descriptor (scd) and its runtime variant, skcd, used for verifiable evaluation.
Once built, these circuits are uploaded to IPFS and used to enable real-time, privacy-preserving visual cryptographic challenges, ensuring each critical user interaction is verifiable and resistant to malware, phishing, and adversarial AI.
3. Install the Android Demo App
Download the APK
Use the specific apk link for the cuurent milestones
androidApp-arm64-release.apk— for Android devices and Apple Silicon(M1/M2/M3/M4)androidApp-x86_64-release.apk— for Android emulators running on x86_64 platforms (e.g., Windows PCs, Intel-based Mac)
Latest version recommended
While the app runs on Apple Silicon (M1–M4), emulator performance may vary due to ARM virtualization and GPU constraints. For accurate testing—especially for Rust-based rendering and cryptographic logic—choose the best available setup:
| Recommended Option | Notes |
|---|---|
| Mid-to-high-end ARM device | Preferred. e.g., Pixel 5–Pixel 8. Avoid Android 16 (API 36) for now. |
| x86_64 emulator (Intel) | Reliable with mid-range or better GPU. |
| Apple Silicon (M3/M4) emulator | Acceptable if GPU is sufficient. Better than M1/M2 for rendering. |
| Apple Silicon (M1/M2) emulator | Works, but may show degraded performance or rendering issues. |
If you already have an older version of the Interstellar Android app installed, you must uninstall it before installing the new build.
The app uses local secure storage and cached configuration; keeping a previous version may lead to inconsistent behavior during transaction signing or validation.
Option 1: Physical Device
- Transfer the APK to your phone or download it directly from the device
- Allow app installation from external sources
- Install the APK
- Connect your devices to Android Studio
Ensure that your device is configured for english language
Option 2: Emulator
- Create a
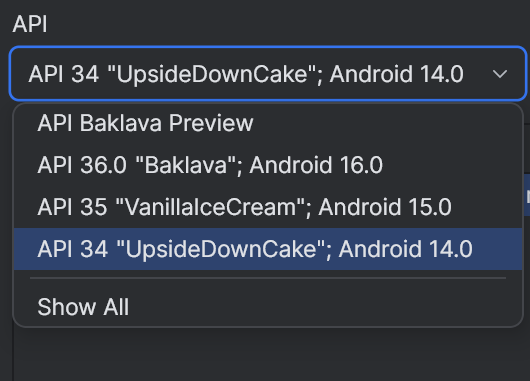
Pixel 7or equivalent emulatorAPI 31+-API 35 - Edit the emulator and select an API 31+ below the default API 36 (API 34 more stable)
- Launch the emulator
- Drag and drop the APK onto the emulator window to install
Our app currently crashes on Android API 36. The issue is not caused by the new 16KB memory page model, as it runs correctly on API 35 with 16KB pages. API 36 is a very recent release and may introduce subtle runtime or platform-level changes that affect low-level Rust code (e.g., garbled circuit evaluator or frame renderer). Until further investigation, we recommend using API 34 (more stable on emulator) or earlier for testing.
On Apple Silicon (M1–M4), emulators may fail to render or execute low-level native code correctly unless software rendering is enabled.
To enable it:
Device Manager → Edit → Advanced Settings → Emulated Performance → Graphics → Software
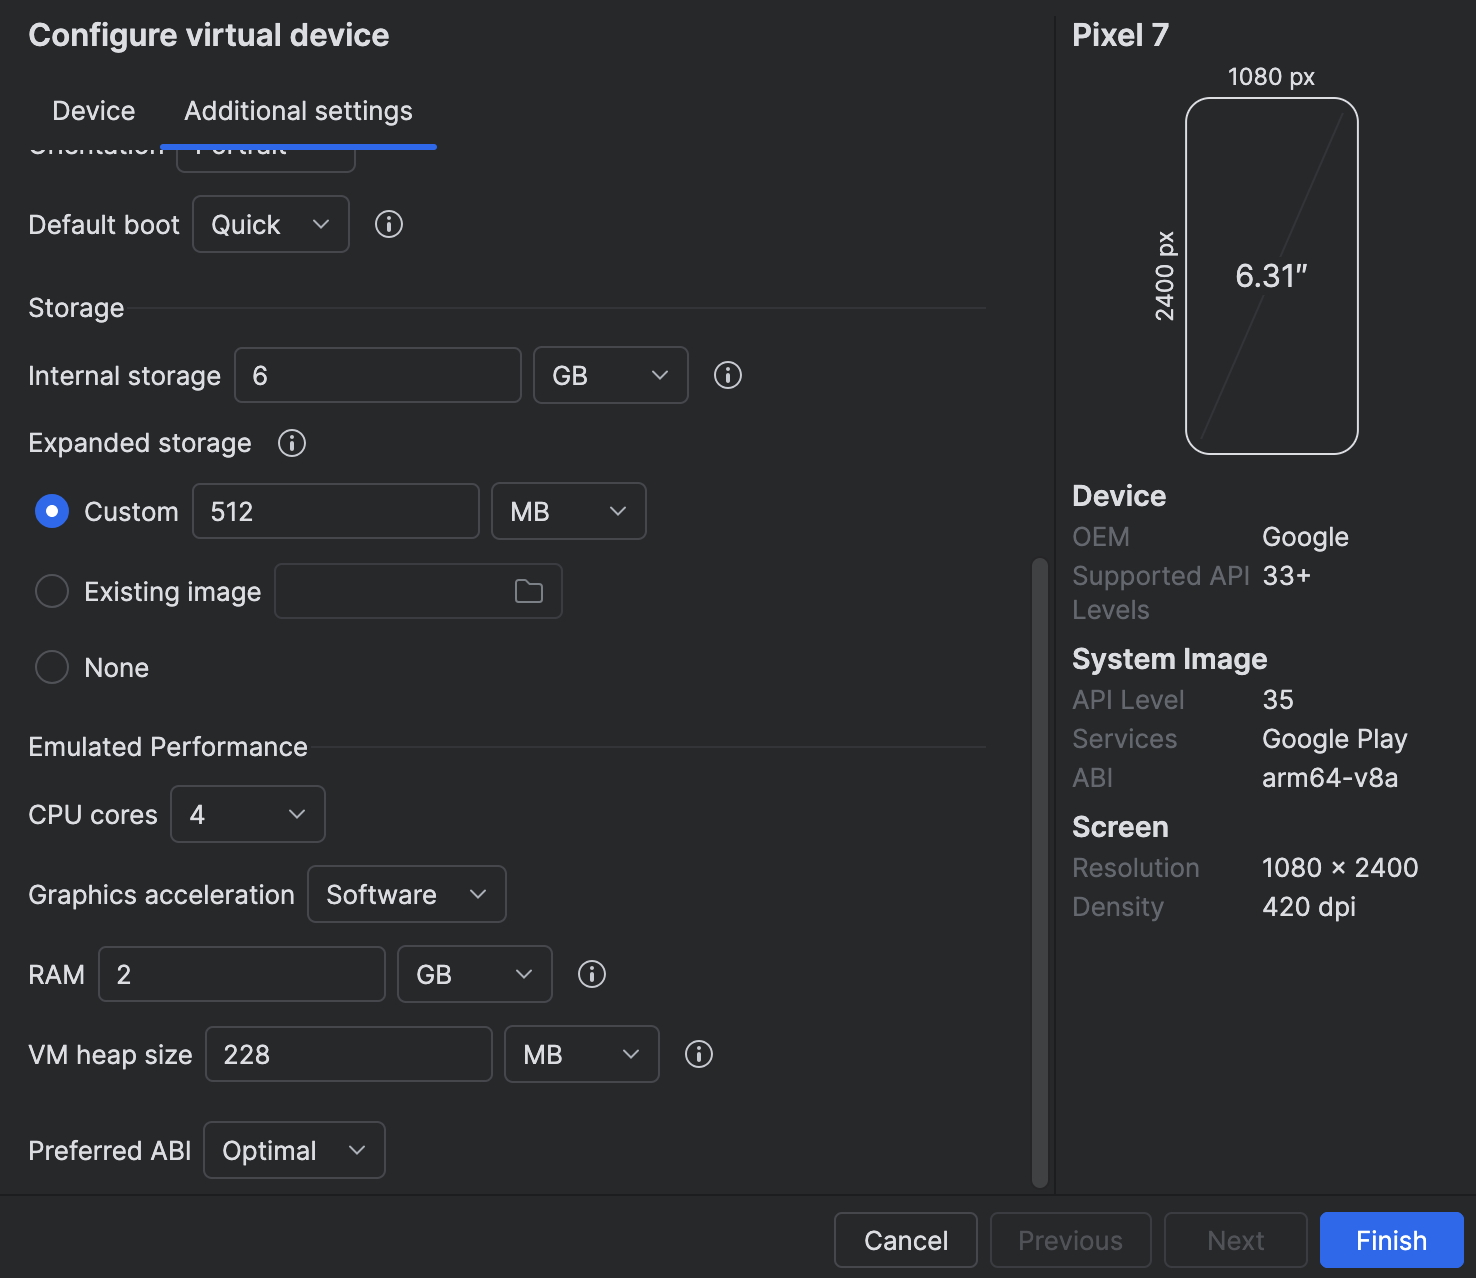
- Mandatory for M1/M2: hardware acceleration is not supported and cause crashes.
- Not tested on M3/M4: may support hardware acceleration, but software mode is safer for compatibility.
Enabling this setting ensures more reliable emulator behavior, especially for native Rust or cryptographic rendering, at the cost of some performance.
2. Link App to your local Interstellar stack:
The Android app is preconfigured to connect to localhost
To allow the Android app to connect to your local blockchain and IPFS stack:
Step 1: adb reverse Setup
On the Desktop connected to the Device or running the Emulator (Windows, Mac OS, Linux)
If Android Studio is already installed, you can enable adb in your terminal by adding it to your PATH with the following command (adjust the path if needed):
Add adb PATH:
Linux:
export PATH=$PATH:$HOME/Android/Sdk/platform-tools
Mac OS:
export PATH="$HOME/Library/Android/sdk/platform-tools:$PATH"
Windows powershell:
$env:Path += ";$env:LOCALAPPDATA\Android\Sdk\platform-tools"
adb reverse tcp:9944 tcp:9944   # Substrate WS
adb reverse tcp:2090 tcp:2090   # Integritee node port
adb reverse tcp:5001 tcp:5001   # IPFS
Make sure adb is properly configured and the emulator or device is detected
with adb devices
You can also check the reverse setup with adb reverse --list
This works for both emulators and real devices connected via USB
Step 2 (optional): ssh Port Forwarding
On the System or VM running the Blockchain stack (WSL2, Remote VM)
If the emulator is running (or the device is connected) on a different network interface than the backend (e.g., the backend runs in WSL2 and the Android emulator or device is connected via USB to Windows), you may need to configure port forwarding between the desktop and the blockchain.
WSL2 -> Windows example:
export WSL_HOST_IP=$(ip route | awk '/default/ {print $3}')
ssh -N -R 9944:localhost:9944 -R 5001:localhost:5001 -R 2090:localhost:2090 [windows_user_name]@$WSL_HOST_IP
To avoid issues with ssh or adb reverse during this local test, you can temporarily disable the Firewall:
Example on Windows with PowerShell (as Administrator):
Set-NetFirewallProfile -Profile Domain,Private,Public -Enabled False
You can re-enable it later with:
Set-NetFirewallProfile -Profile Domain,Private,Public -Enabled True
At this stage, the focus is on ensuring correctness and robustness of the transaction pipeline at the infrastructure level. User-facing aspects such as application UI/UX, visual polish, or cosmetic design are not yet part of the milestone scope. Especially because our focus is the delivery of a mobile SDK.