Android App with Local Nodes
This guide explains how to run the full Interstellar stack locally using Docker or Podman. You will be able to launch the Substrate node, Integritee TEE worker, and IPFS service, then interact with the system using the Interstellar Android demo app.
This setup enables full offline testing without relying on a hosted VPS.
This milestone delivers the core pillars of the Interstellar platform: instant onboarding and a unified Trusted Action Validation Protocol (TAVP) for secure transaction approval and simple but powerfull account recovery mechanisms.
All features have been extensively tested with a focus on user experience, demonstrating how simple, reliable, and intuitive these flows can be. The current interface has been adjusted to support efficient testing, while leaving room for further UX and UI refinements in the production-grade SDK.
Although the system is not yet production-ready, it provides a robust foundation. Broader edge case coverage, interoperability, and resilience guarantees will be the focus of the upcoming SDK and future milestones. Reviewers are encouraged to focus on the functional flow and experience of the key features in this milestone.
This compatibility note applies to the backend stack, tested on Ubuntu 24.04 LTS (x86_64) using Docker (docker-compose) or Podman (with manually installed podman-compose*).
The stack is expected to work on other recent Linux distributions, but this has not been officially verified.
Known issue: May fail on Apple Silicon (M1/M2/M3/M4) - due to current SIMD usage and QEMU/Rosetta limitations - crash on M1/M2 (not tested on M3/M4)
The frontend (e.g., Android emulator or physical device) can run on any OS supported by Android Studio (expect some emulator limitations on Apple Silicon)
*Compose tools are required to manage service startup dependencies (e.g., health checks).
1. Prerequisites
| Requirement | Install Guide |
|---|---|
| Docker | Install Docker |
| Docker Compose | Install docker-compose |
curl, wget, jq | Installed via apt/brew or default in most environments |
| Android Studio | Install Android Studio |
ADB (adb reverse) | Comes with Android Studio |
You may also use Podman as an alternative to Docker.
2. Launch the Interstellar Stack Install
# Step 1: Create a working directory
mkdir interstellar_m1_demo && cd interstellar_m1_demo

# Step 2: Download the stack config
curl -L -o docker-compose.yml https://raw.githubusercontent.com/Interstellar-Network/containers/refs/heads/main/docker-compose.yml
curl -L -o docker-ipfs-init.sh https://raw.githubusercontent.com/Interstellar-Network/containers/refs/heads/main/docker-ipfs-init.sh
chmod +x docker-ipfs-init.sh

# Step 3: Start Docker (if needed)
sudo service docker start  # (for most Linux distros)

# Step 4: Launch the stack
sudo docker compose down --timeout 1 && sudo docker compose up --force-recreate
⏳ Waiting for Master Circuit Generation
Once the node and service are running, the system will automatically trigger the generation of master circuits from the hardware description files.
These circuits are compiled using the Verilog logic generated from the original master circuits specifications, processed through the logic synthesis pipeline. This step may take several minutes depending on the environment.
During this time, monitor the logs and wait for the following sequence of messages:
[ocw-circuits] callback_new_skcd_signed sent number : <number> 1-Success  - 0-Fail
[ocw-circuits] callback_new_display_circuits_package_signed: (<CID_1>, <message_digits_number>), (<CID_2>, <pinpad_digits_number>) for <account_id>
Shortly before these messages, you will also see large blob uploads to IPFS such as:
Requested started id=<...> method=POST uri=http://ipfs:5001/api/v0/add
These blobs correspond to the master visual circuits (SKCD display circuits), which are the result of the hardware synthesis pipeline. Their appearance in the logs is a strong indicator that the build process has completed.
ℹ️ You can identify this moment easily by spotting two large IPFS file hashes being logged together — one for the secure keypad circuit and one for the display message circuit i.e one time code These hashes will later be used for visual challenge rendering and validation.
Detailed example from integritee_node-1
Requested started id=1059 method=POST uri=http://ipfs:5001/api/v0/add
[fetch_from_remote_grpc_web] content_type: application/json
[ocw-circuits] callback_new_skcd_signed sent number : 1
[ocw-circuits] callback_new_display_circuits_package_signed: ("QmUx8mMo8GgGdUhcgFQVg2sexkVfyq1sViruZiBadUfs4d",2),("QmcwXyZNmLXnjeoA25YSzj41G1sr6ZsHgZZBQVWvcfe1qn",10) for d43593c715fdd31c61141abd04a99fd6822c8558854ccde39a5684e7a56da27d (5GrwvaEF...)
[ocw-circuits] Hello from pallet-ocw-circuits.
🛌 Idle (0 peers), best: #6 (...), finalized #3 (...), ⬇ 0 ⬆ 0
You can also verify the runtime is ready using Polkadot.js
While waiting for the stack to fully initialize, you can explore the architecture and rationale behind
the VCA System Layer. This layer is responsible for producing the VCA Token,
the core cryptographic artifact used by the Trusted Action Validation Protocol (TAVP).
The token is generated through a hardware-secure pipeline starting from VHDL logic descriptions, synthesized into
Verilog and compiled using theYosis and abc logic synthesis toolchain. The resulting master circuits define both the secure display and interaction logic — including the Secure Circuit Descriptor (scd) and its runtime variant, skcd, used for verifiable evaluation.
Once built, these circuits are uploaded to IPFS and used to enable real-time, privacy-preserving visual cryptographic challenges, ensuring each critical user interaction is verifiable and resistant to malware, phishing, and adversarial AI.
3. Install the Android Demo App
Download the APK
From the official Interstellar GitHub Release (specific APKs preconfigured to connect to localhost):
androidApp-arm64-release.apk— for Android devices and Apple Silicon(M1/M2/M3/M4)androidApp-x86_64-release.apk— for Android emulators running on x86_64 platforms (e.g., Windows PCs, Intel-based Mac)
While the app runs on Apple Silicon (M1–M4), emulator performance may vary due to ARM virtualization and GPU constraints. For accurate testing—especially for Rust-based rendering and cryptographic logic—choose the best available setup:
| Recommended Option | Notes |
|---|---|
| Mid-to-high-end ARM device | Preferred. e.g., Pixel 5–Pixel 8. Avoid Android 16 (API 36) for now. |
| x86_64 emulator (Intel) | Reliable with mid-range or better GPU. |
| Apple Silicon (M3/M4) emulator | Acceptable if GPU is sufficient. Better than M1/M2 for rendering. |
| Apple Silicon (M1/M2) emulator | Works, but may show degraded performance or rendering issues. |
Option 1: Physical Device
- Transfer the APK to your phone or download it directly from the device
- Allow app installation from external sources
- Install the APK
- Connect your devices to Android Studio
Ensure that your device is configured for english language
Option 2: Emulator
- Create a
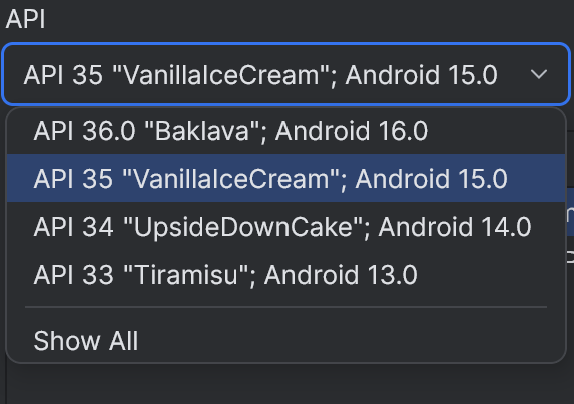
Pixel 7or equivalent emulatorAPI 31+-API 35 - Edit the emulator and select an API 31+ below the default API 36
- Launch the emulator
- Drag and drop the APK onto the emulator window to install
Our app currently crashes on Android API 36. The issue is not caused by the new 16KB memory page model, as it runs correctly on API 35 with 16KB pages. API 36 is a very recent release and may introduce subtle runtime or platform-level changes that affect low-level Rust code (e.g., garbled circuit evaluator or frame renderer). Until further investigation, we recommend using API 35 or earlier for testing.
On Apple Silicon (M1–M4), emulators may fail to render or execute low-level native code correctly unless software rendering is enabled.
To enable it:
Device Manager → Edit → Advanced Settings → Emulated Performance → Graphics → Software
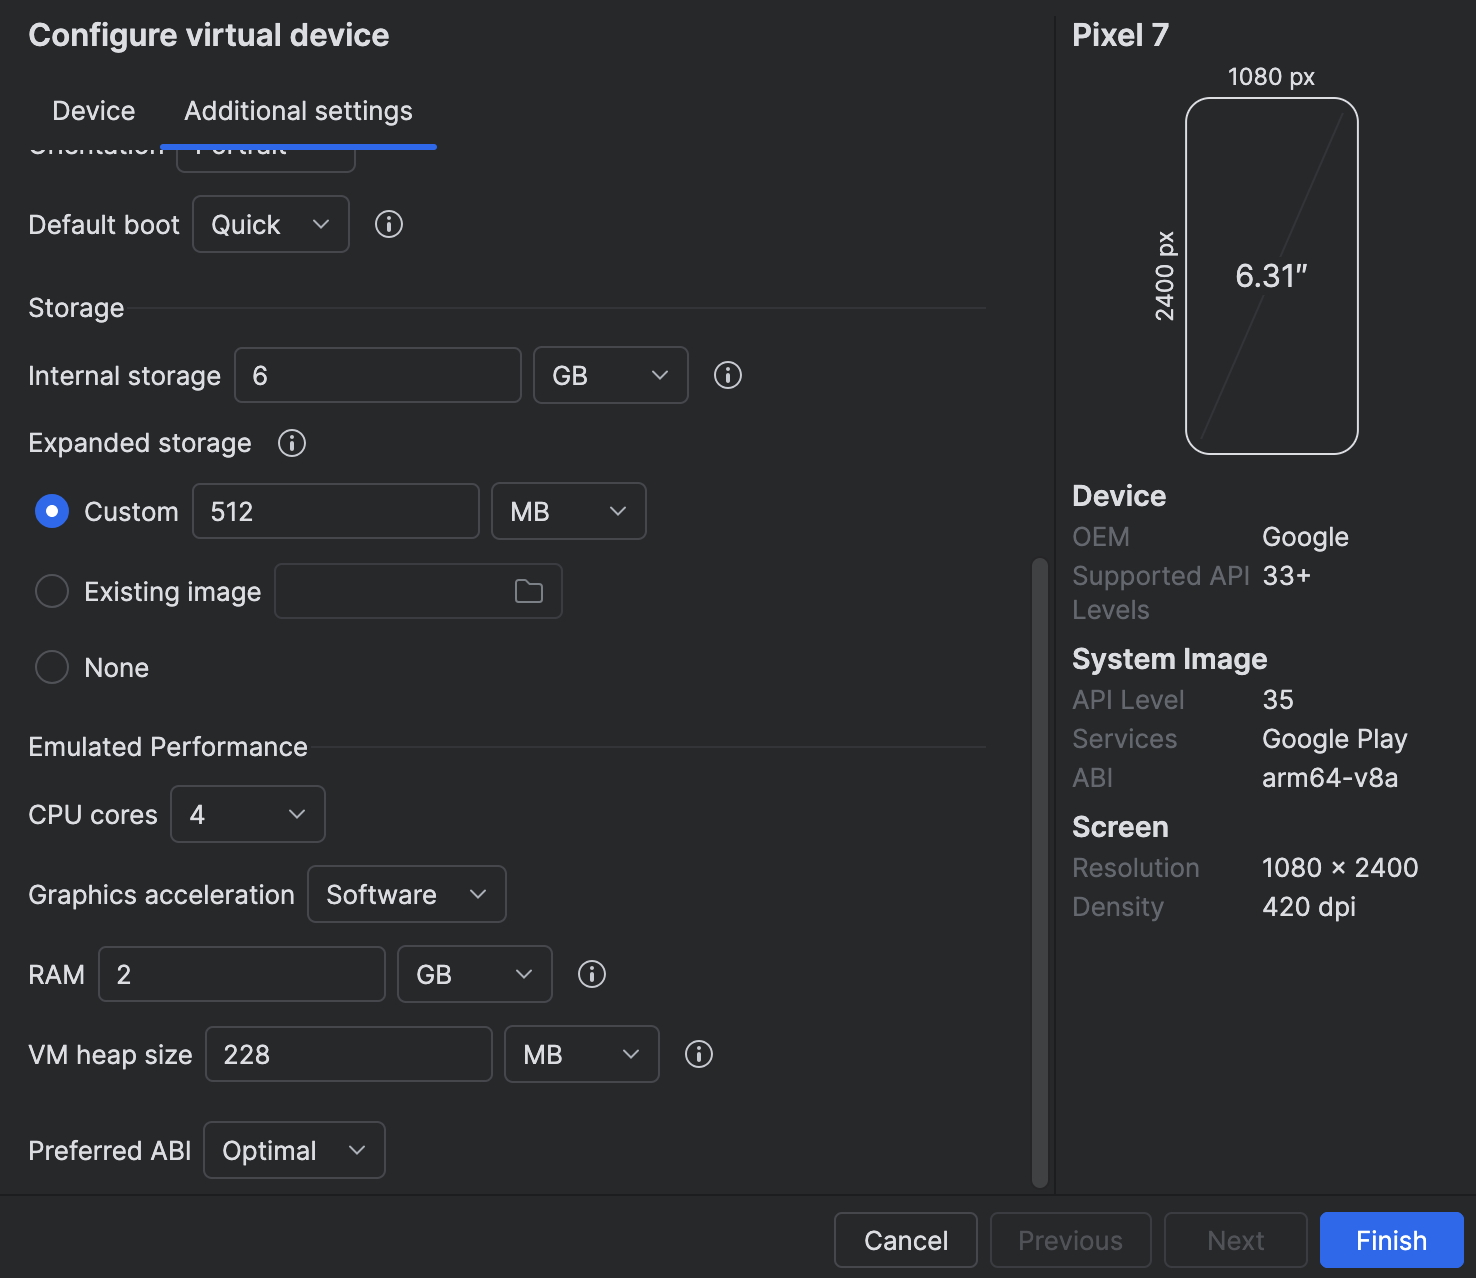
- Mandatory for M1/M2: hardware acceleration is not supported and cause crashes.
- Not tested on M3/M4: may support hardware acceleration, but software mode is safer for compatibility.
Enabling this setting ensures more reliable emulator behavior, especially for native Rust or cryptographic rendering, at the cost of some performance.
2. Link App to your local Interstellar stack:
The Android app is preconfigured to connect to localhost
To allow the Android app to connect to your local blockchain and IPFS stack:
Step 1: adb reverse Setup
On the Desktop connected to the Device or running the Emulator (Windows, Mac OS, Linux)
If Android Studio is already installed, you can enable adb in your terminal by adding it to your PATH with the following command (adjust the path if needed):
Add adb PATH:
Linux:
export PATH=$PATH:$HOME/Android/Sdk/platform-tools
Mac OS:
export PATH="$HOME/Library/Android/sdk/platform-tools:$PATH"
Windows powershell:
$env:Path += ";$env:LOCALAPPDATA\Android\Sdk\platform-tools"
adb reverse tcp:9944 tcp:9944   # Substrate WS
adb reverse tcp:2090 tcp:2090   # Integritee node port
adb reverse tcp:5001 tcp:5001   # IPFS
Make sure adb is properly configured and the emulator or device is detected
with adb devices
You can also check the reverse setup with adb reverse --list
This works for both emulators and real devices connected via USB
Step 2 (optional): ssh Port Forwarding
On the System or VM running the Blockchain stack (WSL2, Remote VM)
If the emulator is running (or the device is connected) on a different network interface than the backend (e.g., the backend runs in WSL2 and the Android emulator or device is connected via USB to Windows), you may need to configure port forwarding between the desktop and the blockchain.
WSL2 -> Windows example:
export WSL_HOST_IP=$(ip route | awk '/default/ {print $3}')
ssh -N -R 9944:localhost:9944 -R 5001:localhost:5001 -R 2090:localhost:2090 [windows_user_name]@$WSL_HOST_IP
To avoid issues with ssh or adb reverse during this local test, you can temporarily disable the Firewall:
Example on Windows with PowerShell (as Administrator):
Set-NetFirewallProfile -Profile Domain,Private,Public -Enabled False
You can re-enable it later with:
Set-NetFirewallProfile -Profile Domain,Private,Public -Enabled True
4. Run the Android App Demo
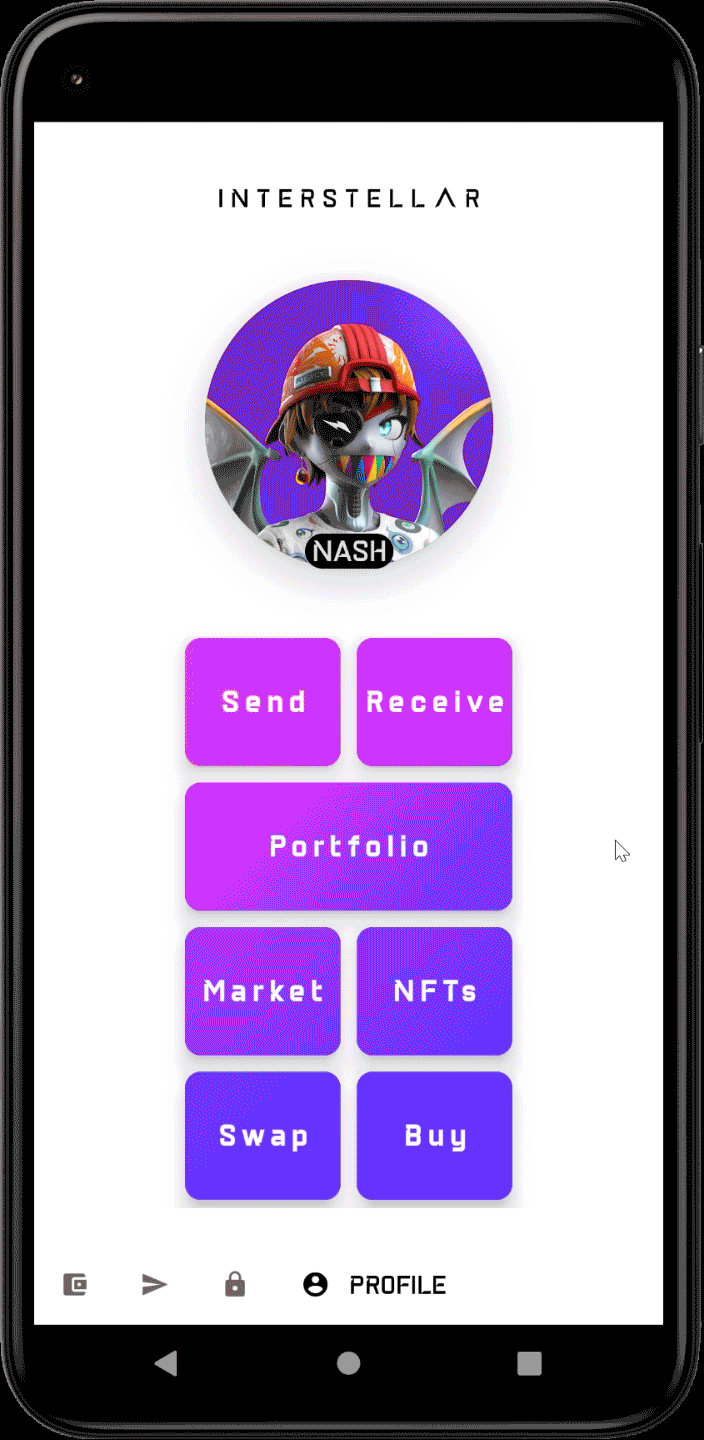
Step 1: Connect & Onboard
- Launch the app
- Register a new mobile account
- Validate biometric & SE-based registration
- Check toasted messages
- Registering
- Registered
Step 2: Test Transaction Validation
-
Trigger the Trusted Action Validation Protocol (TAVP) screen
- Send a test transaction to a contact
- Enter the one-time code (2-digit), or experiment with trial/feedback
- Check toasted messages whith Action Validation Screen
- Creating a demo transaction...
- [error] No circuits available after 10s; exiting!
- [after taping one-time code digits]
- Validating transaction...
- Transaction done!
If you are using an emulator with low-end GPU, or a low-end or outdated Android device with limited GPU, the user experience may be significantly degraded. Although the validation screen may be harder to read in such conditions, you should still be able to complete the test process.
In the future, we plan to introduce a trusted beneficiary feature. This will enable users to register known recipient addresses on-chain through a secure validation process, preventing attackers from substituting contact names with malicious public keys. This enhancement will make the wallet both more secure and user-friendly.
🧪 Step 3: Backup & Recovery — Test Interface for Reviewers
⚠️ Note: This interface is a temporary, test-friendly version designed to make validation easy for reviewers. It does not reflect the final version intended for end-users.
All components shown here are modular and meant to be integrated and restyled by wallet providers and dApps for production use.
To avoid setting up a cloud account in the emulator, we recommend downloading the Material Files app to store the recovery token file locally.
Drag and drop the downloaded apk onto the emulator windows or install it in the emulator with:
curl -O https://f-droid.org/repo/me.zhanghai.android.files_39.apk # linux
Invoke-WebRequest -Uri "https://f-droid.org/repo/me.zhanghai.android.files_39.apk" -OutFile "me.zhanghai.android.files_39.apk" # Powershell
adb install me.zhanghai.android.files_39.apk
Then select "Material Files" from the share menu to save the .enc file.
Warning: crash on API 35 16K or API 36
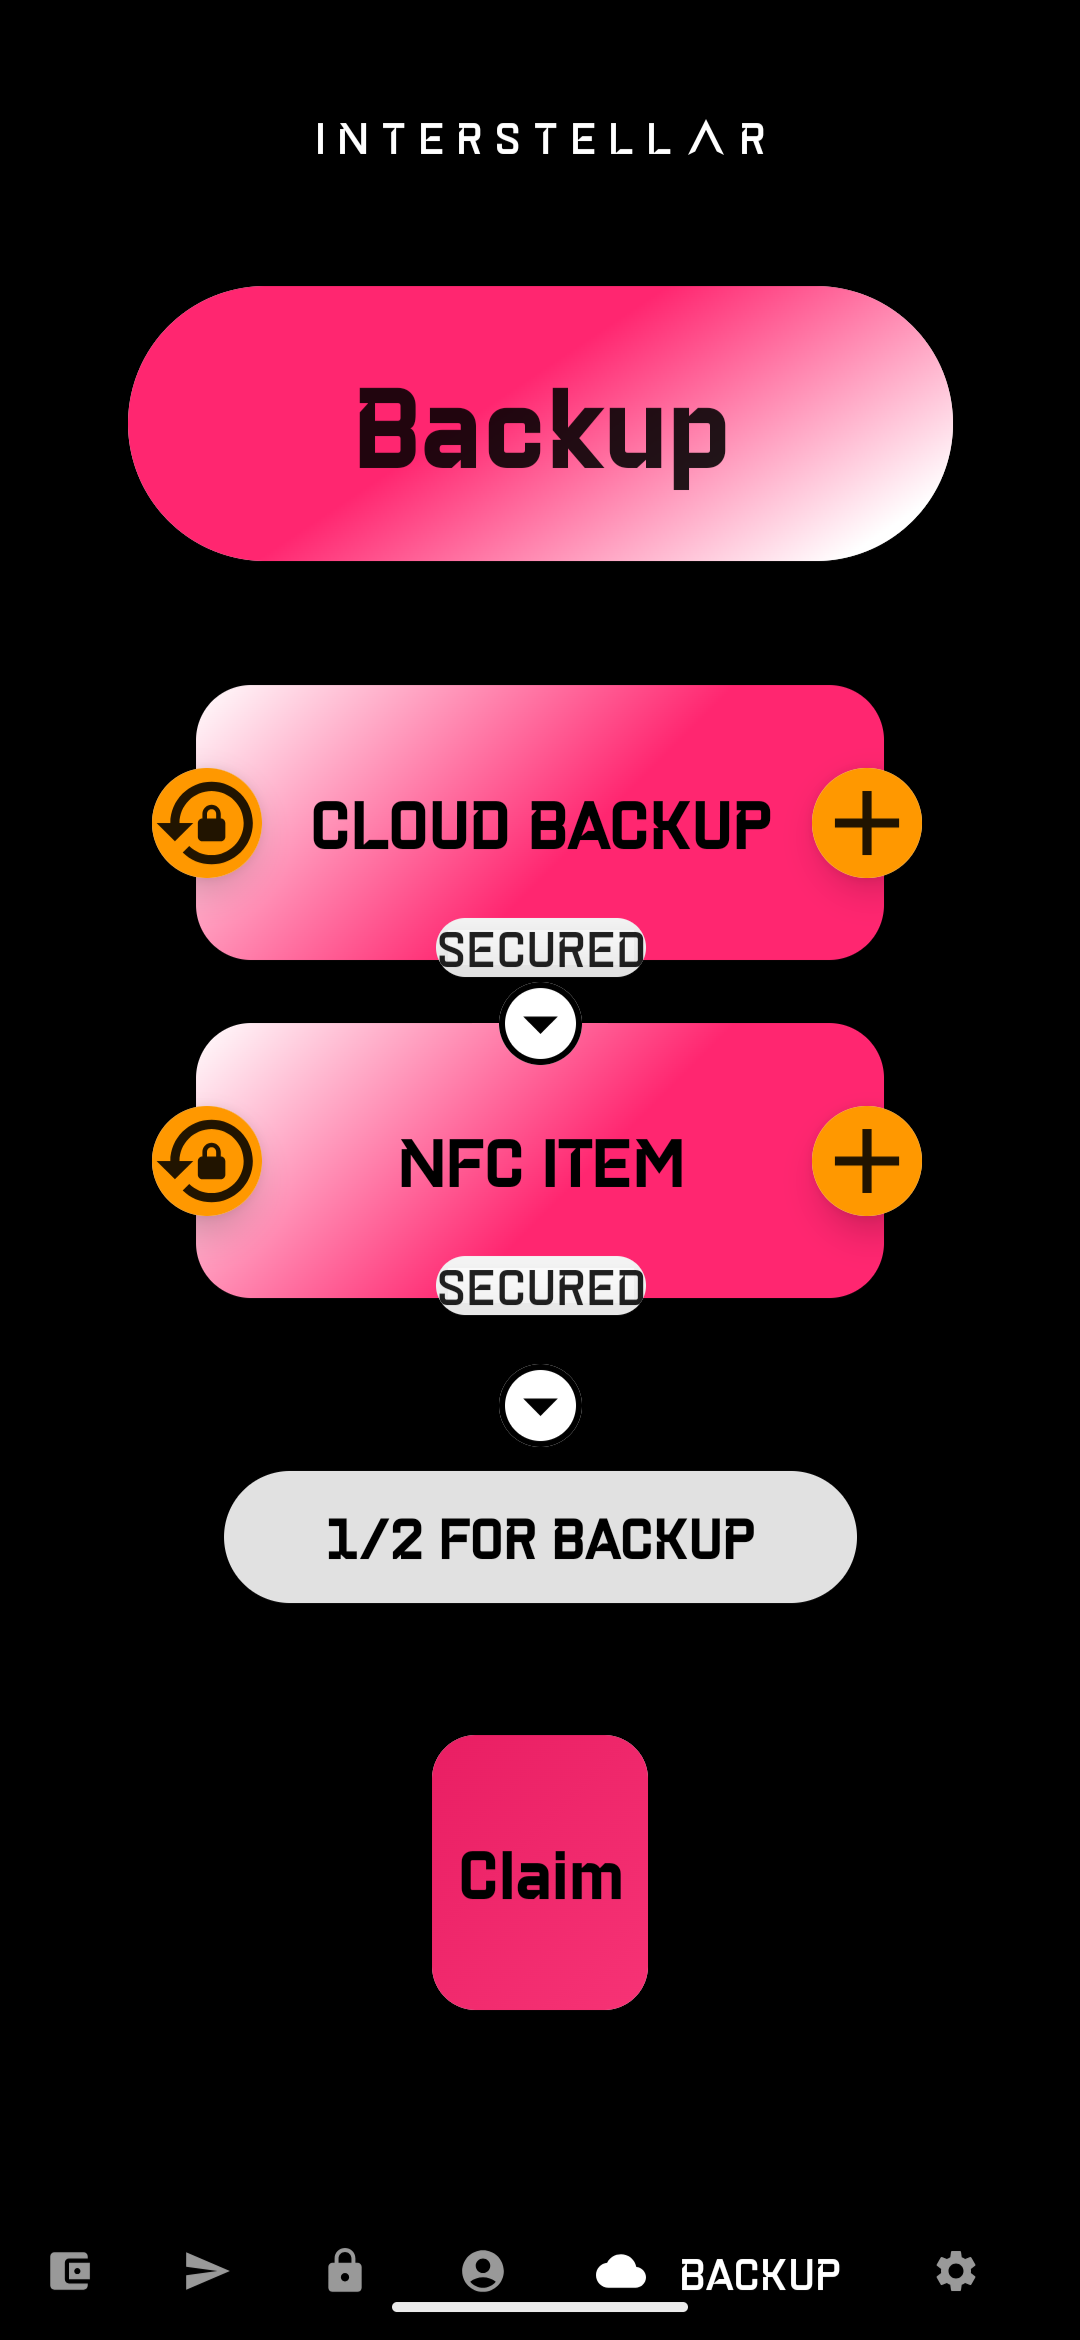
☁️ Use the Backup screen
🟰 Adding Backup Items
+Button
Add backup methods to secure your account:- Cloud Backup: Stores a secure backup file in the cloud. (see the following tip if you use an emulator)
- NFC Item: Register an NFC tag (tap it on the back of the phone) or manually input a serial number or any characters (in an emulator) for testing convenience.
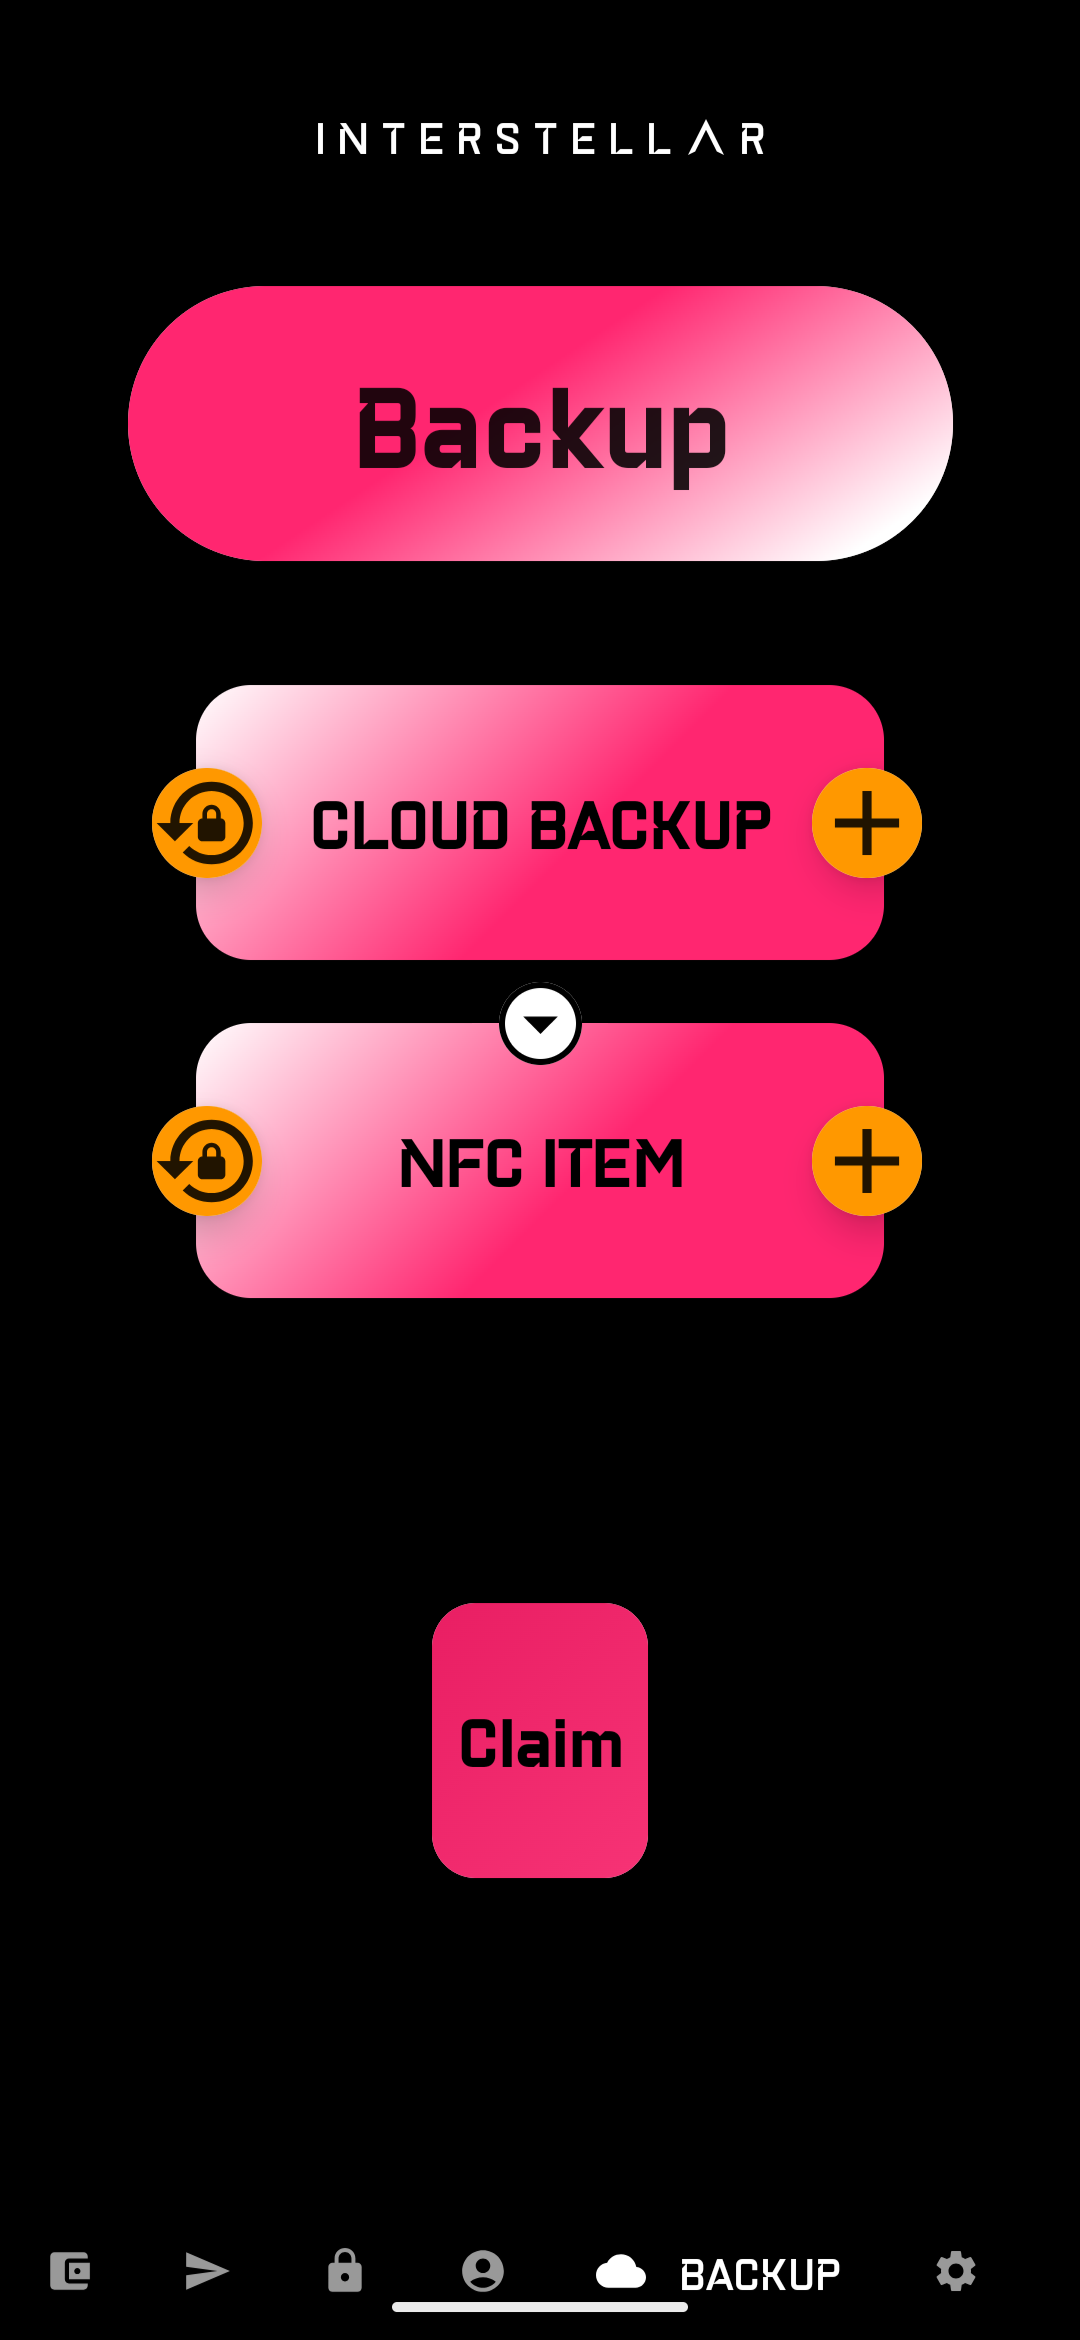
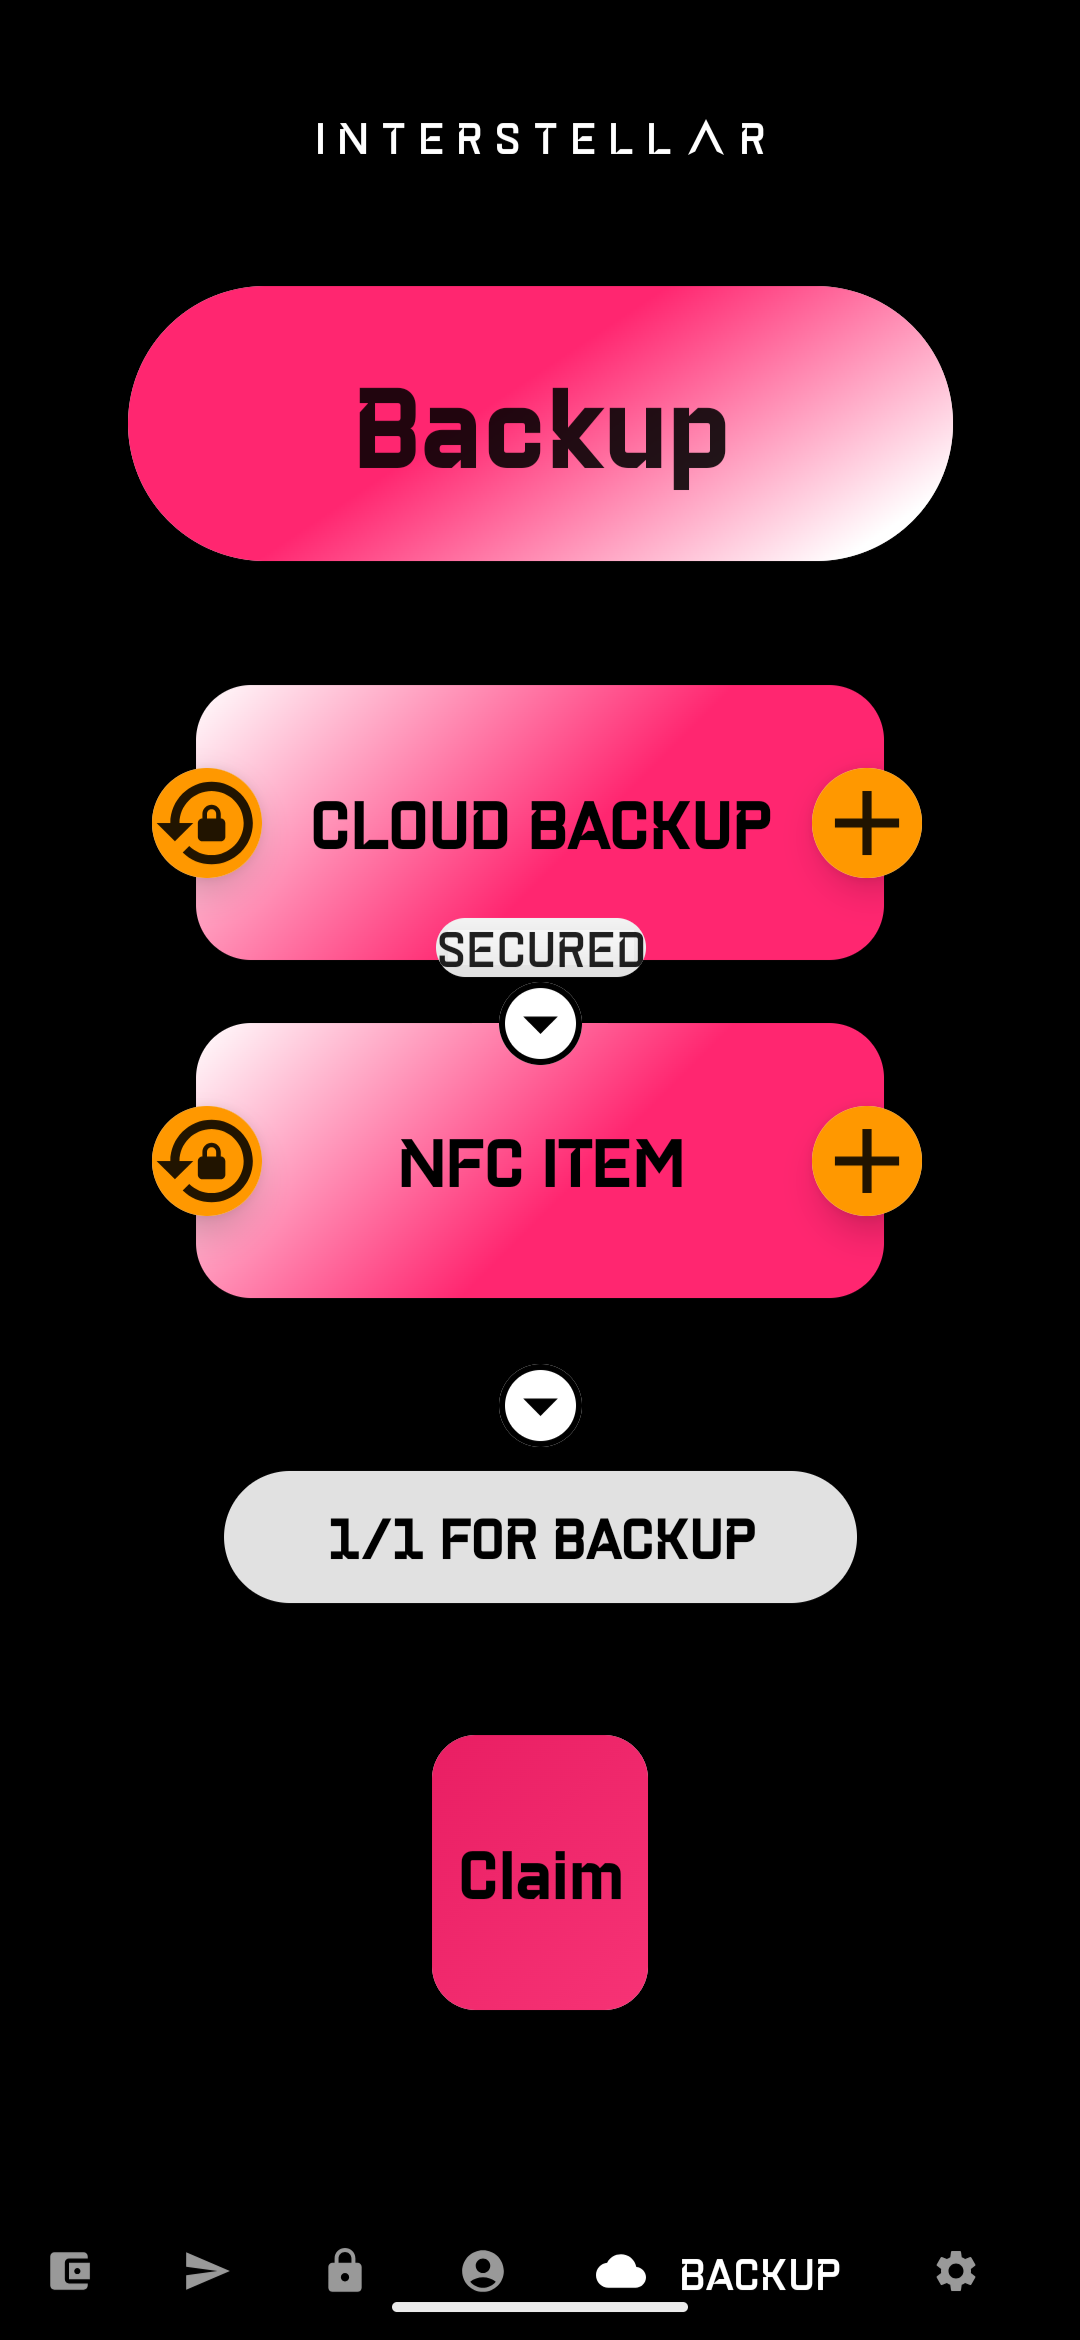
After adding an item:
- A "SECURED" badge will appear below the item.
- The recovery threshold (e.g.
1/1 FOR BACKUP,1/2, etc.) will update accordingly. - You can tap the threshold badge to change the required number of items for a valid recovery (e.g
2/2).

To simplify recovery testing, the app includes a Settings tab with the following options:
-
🆔 ROOT ACCOUNT
Displays the root account address currently linked to the device.
👉 Take a screenshot to verify correct linkage after recovery. -
♻️ RESET APP
Simulates a fresh app install by clearing the local key material.
👉 Triggers a new mobile registration flow to test recovery logic.
This allows reviewers to validate that recovery properly restores the new mobile identity to the original root account.
🔁 Reset & Recovery Flow
- Reset App
In the Settings screen , take a screenshot (camera iconin the emulator), then touch theRESET APPbutton to simulate an app reinstall on a new device. you will see the Registering and Registered toasted messages and a new root account address. You are now ready to iniate a recovery process
This process will register a new mobile identity on-chain and allow you to use previously added backup items (NFC or cloud) to claim your original (root) account.
- Start the Recovery Process
- The
yellow lock buttonicon at the left of the items are used to initiate recovery with the backup items.- Cloud Backup: Select the
.encfile in the cloud or through Material File in emualator. Once downloaded a validation screen will appear, type the 2 digits code. - NFC Item: Tap the NFC item (on the back of the phone) or manually input the serial number in emulator.
- Cloud Backup: Select the
- Then use Claim button to finalize the recovery process.
- Verify you restore your original root account on the
Settingscreen.
- The
This temporary interface has been designed for clarity and testability, not end-user polish. Feel free to simulate multiple recovery scenarios (e.g. 1/1, 1/2, 2/2 2/3 setups)
🛠️ You can check the logs from your local stack to see whtat happen begind the hood when you interact with the blockchain:
extrinsicssent,errormessages whenthresholdis not meet,vouchingitems not succesful, etc..
The app does not currently track the recovery process states. As a result, the success of a vouch extrinsic must be confirmed via logs. In the final SDK version, the interface will reflect the onchain state directly.
Important: Once a user registers with a specific NFC tag (or manually entered serial on emulator or device whithout NFC capabilities), they cannot register again with the same one until the backend stack is restarted (e.g., by restarting the Docker Compose setup with --force-recreate).
Interpreting Logs
When interacting with the mobile app (e.g., authentication, transaction validation, recovery),
key log messages are printed by both integritee-node and integritee-service.
Trusted Action Validation Highlight
These logs help verify that Trusted Action Validation flows used both in transaction validation and recovery are working as expected.
Key messages to look for:
Challenge screen rendering (garbled circuit evaluation):
[tx-validation] store_metadata_aux: message_digits = [9, 7], pinpad_digits = [8, 4, 6, 7, 3, 1, 5, 2, 9, 0]
Succesfull or Failed Validations (timing or incorrect code touchscreens positions)
- If you enter an invalid code:
[tx-validation] TxFail - If correct:
[tx-validation] TxPass
🛠️ Mobile Registration
This log trace shows what happens when a new device connects to the system and is not yet registered under a root account. The backend detects the missing account and proceeds with registration:
[INFO  pallet_mobile_registry::pallet] ensure_has_root_account failed for  while checking if registered: Module(ModuleError { index: 16, error: [0, 0, 0, 0], message: Some("RootAccountNotFound") })
[DEBUG pallet_mobile_registry::pallet] register_mobile start for
[DEBUG pallet_mobile_registry::pallet] register_mobile: new registration for
[DEBUG pallet_mobile_registry::pallet] register_mobile end
✅ What to Look For
RootAccountNotFound: expected on first connection from a new mobile identity.register_mobile start→register_mobile end: confirms that registration was initiated and completed.- These logs confirm that the system automatically falls back to registering the mobile when not yet linked to a root account.
Learn more on Account Abstraction Layer
🛠️ VCA Token Generation and Metadata Preparation
The following logs represent the backend activity triggered by a mobile app requesting a new secure visual validation
i.e VCA token generation. This includes:
- Garbled circuit rendering for the transaction or sensitive action display.
- Selection of digits and randomized pinpad.
- Storage of metadata used later for user input touchscreen validation.
You should see logs similar to the following:
[INFO  pallet_ocw_garble::pallet] [ocw-garble] garble_and_strip_display_circuits_package_signed: ("TRANSACTION AMMOUNT to DESTINATION" for )
[WARN  pallet_ocw_garble::pallet] get_ocw_circuits_storage_value: storage COULD NOT be read! Fallback to RPC...
[INFO  pallet_ocw_garble::pallet] get_ocw_circuits_storage_value response : <wasm:stripped>
[INFO  pallet_ocw_garble::pallet] display_circuits_package: ("Qmaq13hbrSK7th8kA6CyP5cfviMshv46ZzxZ63aRopvpgF",2) ("QmR9DRACkkgwmyoSNGVX9m54AGZ6mkGkAGxwCLXMzi4aUP",10)
[INFO  pallet_ocw_garble::pallet] pinpad_digits: [6, 2, 5, 4, 1, 9, 7, 3, 8, 0], message_digits: [5, 9]
[INFO  pallet_ocw_garble::pallet] callback_new_garbled_and_strip_signed: "QmSJSSsyHV9aZCqCvv6QZwJ3K7vf4YoqF1DAWAAwsD7m6w" ; "QmSDGvEFH2sDnNg5zCA4Nr4Zd3mByYs9Mmg994DWL8yiK6" for
[INFO  pallet_tx_validation::pallet] store_metadata_aux: message_pgarbled_cid = "QmSJSSsyHV9aZCqCvv6QZwJ3K7vf4YoqF1DAWAAwsD7m6w", message_digits = [5, 9], pinpad_digits = [6, 2, 5, 4, 1, 9, 7, 3, 8, 0]
[INFO  pallet_tx_validation::pallet] store_metadata_aux: done!
[INFO  pallet_ocw_garble::pallet] callback_new_garbled_and_strip_signed: done!
✅ What to Look For
display_circuits_package:confirms the transaction display garbled circuit has been rendered.message_digitsandpinpad_digits: the random digits selected for the user's challenge.store_metadata_aux: done!: metadata was correctly stored for later validation.callback_new_garbled_and_strip_signed: done!: confirms generation and signing succeeded.
🛠️ Visual Cryptographic Challenge Validation
When the user correctly responds to the visual cryptographic challenge through
VCA token evaluation on the mobile, the following logs will appear
in the integritee_service container.
These confirm that the digits were correctly interpreted and that the result was successfully committed:
[INFO  pallet_tx_validation::pallet] [tx-validation] check_input: who = , ipfs_cid = "QmSJSSsyHV9aZCqCvv6QZwJ3K7vf4YoqF1DAWAAwsD7m6w", input_digits = [2, 5]
[INFO  pallet_tx_validation::pallet] [tx-validation] check_input: input_digits_str = "\u{2}\u{5}", input_digits_int = [2, 5], pinpad_permutation = BoundedVec([6, 2, 5, 4, 1, 9, 7, 3, 8, 0], 10)
[INFO  pallet_tx_validation::pallet] [tx-validation] check_input: computed_inputs_from_permutation = [5, 9], message_digits = BoundedVec([5, 9], 10)
[INFO  pallet_tx_validation::pallet] [tx-validation] TxPass
[INFO  pallet_tx_registry::pallet] [tx-registry] store_tx_result: who = , message_pgarbled_cid = "QmSJSSsyHV9aZCqCvv6QZwJ3K7vf4YoqF1DAWAAwsD7m6w", result = <wasm:stripped>
[INFO  pallet_tx_registry::pallet] [tx-registry] store_tx_result: done! [BoundedVec([<wasm:stripped>], 16)]
✅ What to Look For
check_input: input_digits = [2, 5]: these are the digits entered by the user in response to the challenge.computed_inputs_from_permutation = [5, 9]: the backend decodes the expected message digits based on the randomized pinpad layout.TxPass: confirms that the decoded digits match the expected message and the validation is successful.store_tx_result: done!: indicates that the result of this validation (pass/fail) was committed to the registry for audit or future reference.
❌ What to Look For
check_input: input_digits = [...]: shows the digits entered by the user.computed_inputs_from_permutation = [...]: the expected message digits decoded from the pinpad permutation.TxFail: indicates that the user's input did not match the expected digits — the validation failed.store_tx_result: done!: even in failure cases, the result is still stored for transparency, auditability, or rate-limiting purposes.
Learn more on Authentication Layer
computed_inputs_from_permuation detailed
🛠️ NFC tag-based Recovery Setup
The following logs represent the flow where a user device sets up a recovery mechanism using an NFC tag. This involves:
- Adding the NFC tag to the registry.
- Creating a new
unify_recoveryconfiguration. - Mapping the NFC tag to a
KeyFriend. - Ensuring threshold conditions are satisfied.
- Finalizing and storing the recovery configuration on-chain.
You should observe logs similar to the following:
[DEBUG pallet_nfc_recovery::pallet] add_nfc_tag : who =
[DEBUG pallet_unify_recovery::pallet] execute_create_recovery : START , None, None, NfcTag(...)
[DEBUG pallet_unify_recovery::pallet] ensure_has_root_account who:
[DEBUG pallet_unify_recovery::pallet] execute_create_recovery : CHECK Root Account OK
[DEBUG pallet_unify_recovery::pallet] has_active_recovery who:
[DEBUG pallet_unify_recovery::pallet] execute_create_recovery : CHECK AlreadyStarted OK
[DEBUG pallet_unify_recovery::pallet] get_default_recovery_settings
[DEBUG pallet_unify_recovery::pallet] execute_create_recovery : pending ActiveFriends { threshold: 1, key_friend_pairs: [...] }
[DEBUG pallet_unify_recovery::pallet] is_recoverable who:
[DEBUG pallet_unify_recovery::pallet] execute_create_recovery : threshold = 1
[DEBUG pallet_unify_recovery::pallet] map_friend_with_recovery_method : NfcTag(...), (...)
[DEBUG pallet_unify_recovery::pallet] get_proxy_account : [...]
[DEBUG pallet_unify_recovery::pallet] map_friend_with_recovery_method DONE
[DEBUG pallet_unify_recovery::pallet] execute_create_recovery : friend_account =
[DEBUG pallet_unify_recovery::pallet] execute_create_recovery : pending AFTER = ActiveFriends {...}
[DEBUG pallet_unify_recovery::pallet] execute_create_recovery : friends = [, ]
[DEBUG pallet_unify_recovery::pallet] execute_create_recovery : CHECK threshold OK = [, ]
[DEBUG pallet_unify_recovery::pallet] execute_create_recovery : clearing recovery state OK
[DEBUG pallet_unify_recovery::pallet] clear_recovery_state :
[DEBUG pallet_unify_recovery::pallet] clear_recovery_state : recoverable found =
[DEBUG pallet_unify_recovery::pallet] clear_recovery_state : remove_recovery DONE
[INFO  pallet_unify_recovery::pallet] execute_create_recovery : DONE for
[INFO  pallet_nfc_recovery::pallet] add_nfc_tag : DONE
✅ What to Look For
execute_create_recovery : STARTthroughDONE: confirms the recovery flow using an NFC tag completed without errors.threshold = 1: confirms that recovery quorum has been set (e.g., single tag for recovery).ActiveFriendsincludes both a CID-based and an NFC-basedKeyFriend.map_friend_with_recovery_method DONE: shows that the NFC tag was correctly interpreted and linked.clear_recovery_stateensures old states are removed before registering a new configuration.add_nfc_tag : DONE: confirms the NFC identifier has been saved in the registry and linked to the user.
This log sequence confirms a successful setup of an NFC-based recovery configuration within the unified recovery module.
🛠️ Cloud Backup VCA Token-based Recovery Setup
The following logs describe a successful recovery configuration setup using a CID-based key, which refers to a cloud-stored recovery asset (e.g., a backed-up VCA Token). This process involves:
- Triggering
extended_create_recoveryvia the cloud backup flow. - Generating and storing a VCA challenge for user authentication.
- Creating a
KeyFriendbased on the cloud CID. - Registering the friend account and checking recovery eligibility.
Expected logs:
[DEBUG pallet_token_recovery::pallet] extended_create_recovery : who =
[INFO  pallet_tx_validation::pallet] store_metadata_aux: message_pgarbled_cid = "...", message_digits = [...], pinpad_digits = [...]
[INFO  pallet_tx_validation::pallet] store_metadata_aux: done!
[DEBUG pallet_unify_recovery::pallet] execute_create_recovery : START ..., Cid(...)
[DEBUG pallet_unify_recovery::pallet] ensure_has_root_account who:
[DEBUG pallet_unify_recovery::pallet] execute_create_recovery : CHECK Root Account OK
[DEBUG pallet_unify_recovery::pallet] has_active_recovery who:
[DEBUG pallet_unify_recovery::pallet] execute_create_recovery : CHECK AlreadyStarted OK
[DEBUG pallet_unify_recovery::pallet] get_default_recovery_settings
[DEBUG pallet_unify_recovery::pallet] execute_create_recovery : pending ActiveFriends { threshold: 1, key_friend_pairs: [], delay_period: 10 }
[DEBUG pallet_unify_recovery::pallet] execute_create_recovery : threshold for NOT recoverable
[DEBUG pallet_unify_recovery::pallet] map_friend_with_recovery_method : Cid(...), (...)
[DEBUG pallet_unify_recovery::pallet] get_proxy_account : [...]
[DEBUG pallet_unify_recovery::pallet] friend_account :
[DEBUG pallet_unify_recovery::pallet] map_friend_with_recovery_method DONE
[DEBUG pallet_unify_recovery::pallet] execute_create_recovery : pending AFTER = ActiveFriends {...}
[DEBUG pallet_unify_recovery::pallet] execute_create_recovery : CHECK threshold OK = []
[INFO  pallet_unify_recovery::pallet] execute_create_recovery : DONE for
[INFO  pallet_token_recovery::pallet] extended_create_recovery : DONE
✅ What to Look For
extended_create_recoveryandCid(...): confirms that the recovery setup was triggered using a CID-backed cloud recovery key.store_metadata_aux: done!: ensures that a corresponding visual challenge has been generated for secure user validation.map_friend_with_recovery_methodwith a CID input: confirms correct linking between the cloud-stored token and the account's recovery logic.ActiveFriendswith the CID-basedKeyFriend: confirms the friend registration is complete.threshold OKandexecute_create_recovery : DONE: confirms all recovery criteria were met and configuration finalized.
ℹ️ In this flow, the CID typically points to a trusted, encrypted, cloud-backed VCA Token that can be retrieved and validated securely by the user.
🛠️ Vouching a VCA Token during Recovery Process
This flow illustrates a successful vouch operation for a VCA Token during a recovery procedure. It does not yet trigger the actual recovery, but rather registers support from a trusted identity (e.g. cloud-based, NFC, or another VCA-backed device).
The system:
- Validates the VCA Token via a cryptographic challenge.
- Checks that the CID is known and linked to an eligible lost account.
- Records a vouch that may contribute toward the threshold needed to initiate full recovery.
Expected logs:
[DEBUG pallet_token_recovery::pallet] extended_recovery_with_vouch : recovery_account = [...]
[DEBUG pallet_token_recovery::pallet] validate_cid : cid = BoundedVec([...], 64)
[DEBUG pallet_token_recovery::pallet] is_cid_registered : cid = ..., lost_account = [...], recovery_account = [...]
[INFO  pallet_tx_validation::pallet] check_input: ipfs_cid = "...", input_digits = [...]
[INFO  pallet_tx_validation::pallet] computed_inputs_from_permutation = [...], message_digits = [...]
[INFO  pallet_tx_validation::pallet] TxPass
[DEBUG pallet_unify_recovery::pallet] execute_vouch_recovery : START ..., Cid(...)
[DEBUG pallet_unify_recovery::pallet] execute_initiate_recovery : START ...
[INFO  pallet_unify_recovery::pallet] execute_initiate_recovery : DONE
[INFO  pallet_unify_recovery::pallet] execute_vouch_recovery : DONE
[INFO  pallet_token_recovery::pallet] extended_recovery_with_vouch : DONE
✅ What to Look For
validate_cidandis_cid_registered: confirms the VCA Token being vouched for is valid and recognized.TxPass: indicates that the digits entered in response to the visual challenge were successfully validated.execute_vouch_recovery: logs the vouch as part of the ongoing recovery process.extended_recovery_with_vouch : DONE: confirms that this particular vouch has been successfully recorded.
ℹ️ This step contributes to a multi-party recovery threshold. (e.g 1/1, 1/2, 2/4, etc..) Once enough valid vouches have been submitted (e.g. from other devices, friends, or backups), the recovery can be finalized with a separate claim operation.
🛠️ Vouching with an NFC Tag during Recovery Process
This log trace corresponds to a vouch operation using an NFC tag, where the system verifies the tag and records a vouch toward the recovery of a lost account.
This does not trigger recovery directly, but contributes toward reaching the threshold of trusted identities needed for a successful claim.
In this case, the NFC tag is interpreted as a KeyFriend identity used to confirm the recovery intent.
Expected logs:
[DEBUG pallet_nfc_recovery::pallet] validate_nfc_tag : recovery_account = [...]
[DEBUG pallet_unify_recovery::pallet] get_accounts : NfcTag(BoundedVec([...], 64))
[DEBUG pallet_unify_recovery::pallet] execute_vouch_recovery : START ..., NfcTag(...)
[DEBUG pallet_unify_recovery::pallet] ensure_has_root_account who:
[DEBUG pallet_unify_recovery::pallet] execute_initiate_recovery : START ...
[INFO  pallet_unify_recovery::pallet] execute_initiate_recovery : DONE
[WARN  sp_io::storage] storage::start_transaction unimplemented
[WARN  sp_io::storage] storage::commit_transaction unimplemented
[INFO  pallet_unify_recovery::pallet] execute_vouch_recovery : DONE
[INFO  pallet_nfc_recovery::pallet] validate_nfc_tag : DONE
✅ What to Look For
validate_nfc_tag: confirms that the NFC tag has been read and mapped to a known recovery identity.execute_vouch_recovery : START→DONE: indicates that the system has successfully registered the vouch.execute_initiate_recovery : DONE: shows that the protocol has verified the recovery context and recorded it internally.- These logs confirm that the NFC-based vouch has been accepted and stored, contributing toward the recovery threshold.
ℹ️ This step is typically followed by additional vouches (e.g. from other devices or trusted backups), until the threshold is met and a
claim_recoverycall is triggered to finalize the recovery process.
🛠️ Final Recovery Claim
This log trace corresponds to the finalization of an account recovery,
Once the recovery threshold is satisfied (e.g., via previous vouch operations), this claim_recovery_with_nfc call finalizes the process. It:
- Confirms the root account is still authorized.
- Transfers recovery control back to the lost account.
- Cleans up all recovery-related metadata (NFC tag, CID for VCA token, mappings, etc.).
Expected logs:
[DEBUG pallet_nfc_recovery::pallet] claim_recovery_with_nfc : recovery_account = [...]
[DEBUG pallet_unify_recovery::pallet] execute_claim_recovery : START [...]
[DEBUG pallet_unify_recovery::pallet] ensure_has_root_account who:
[DEBUG pallet_unify_recovery::pallet] execute_claim_recovery : BEFORE RecoveryToLostAccount
[DEBUG pallet_unify_recovery::pallet] execute_claim_recovery : BEFORE claim_recovery: lost_account = [...], nb_consumers = 0, nb_providers = 1
[DEBUG pallet_unify_recovery::pallet] execute_claim_recovery : BEFORE remove_lost_account
[DEBUG pallet_unify_recovery::pallet] execute_claim_recovery : BEFORE add_recovery_as_device_account
[DEBUG pallet_unify_recovery::pallet] clear_account_recovery_mappings : [lost_account], [recovery_account]
[DEBUG pallet_unify_recovery::pallet] clear_account_recovery_mappings : found friends: ActiveFriends {...}
[DEBUG pallet_unify_recovery::pallet] clear_account_recovery_mappings : removing NfcTag: ...
[DEBUG pallet_unify_recovery::pallet] clear_account_recovery_mappings : removing CID: ...
[DEBUG pallet_unify_recovery::pallet] clear_account_recovery_mappings : removing LOST: ...
[DEBUG pallet_unify_recovery::pallet] clear_account_recovery_mappings : DONE
[INFO  pallet_unify_recovery::pallet] execute_claim_recovery : DONE for
[INFO  pallet_nfc_recovery::pallet] claim_recovery_with_nfc : DONE
✅ What to Look For
claim_recovery_with_nfc: access to pallet_unify frompallet_nfc_recoverynote: could also be accessed throughpallet_token_recoveryexecute_claim_recovery : START→DONE: indicates the successful transfer of recovery authority back to the lost account.clear_account_recovery_mappings: confirms cleanup of all temporary recovery state, including CID and NFC entries.- No errors or threshold violations indicate the recovery was successfully authorized and committed.
ℹ️ This is the final step in the Trusted Recovery process. After this point, the recovered device is fully operational under the recovered root account.
🧩 Recovery Claim: Execution Flow Clarification
The recovery claim can be initiated via either pallet_nfc_recovery or pallet_token_recovery, using:
claim_recovery_with_nfcclaim_recovery_with_token
These functions do not perform additional validation of the method used to initiate them. Instead, they act as entry points to trigger the unified recovery flow orchestrated by pallet_unify_recovery.
✅ What Happens Internally
Regardless of how the claim is triggered, pallet_unify_recovery:
- Checks whether the recovery threshold has been reached, based on previously registered vouching events (e.g., via VCA token, NFC tag, or later with additional method or trusted contacts),
- Executes the recovery if the conditions are met,
- Clears all recovery-related state, including:
- VCA token metadata (CID),
- Associated NFC tags,
- Lost account references.
⚠️ Important:
The pallet used to initiate the claim (NFC or VCA token) does not imply that method was used for vouching.
The claim operation is simply a trigger — the actual authorization logic is enforced bypallet_unify_recovery.
This design ensures that recovery claims remain modular, flexible, and consistent across the current Recovery Layer architecture.
Learn more on Recovery Layer
Optional: Front-End Access
You can inspect chain state and transactions via:
- Polkadot.js Apps
- Or your preferred Substrate front-end UI
Notes
- All services run in Docker containers and use local ports
9944,2090, and5001 - This setup replicates the same runtime environment used in hosted testnets but fully self-contained
- Ideal for offline testing, developer evaluation, or deeper inspection of runtime logs
This Android application is provided as a technical demonstration of Interstellar’s secure Web3 account infrastructure. It serves as a foundation for the forthcoming Android and iOS SDKs, which are still under active development.
Please note that the current user interface and experience are not representative of the final product. Both UI and UX will be significantly refined to align with Interstellar’s core mission: delivering the highest levels of simplicity and security in mobile self-custody.
If you've jumped straight into the evaluation, we recommend consulting the Milestone 1 documentation for key context. It outlines the core architecture, backend logic, and trusted execution flows implemented in this milestone.
The documentation is modular—feel free to explore only the sections most relevant to your review or interest.
You can also use the search bar (top right corner) to locate specific topics quickly. Helpful keywords include:
VHDL,circuits,garbled,TEE,integritee,SE attestationNFC,VCA,recovery,threshold,trusted UXcomparison,passkey,ledger,authentication,compliance,security,ATT&CK
Next Steps:
- Try the Advanced CLI Demo to interact directly with the TEE and garbled circuits logic.